When someone fills out a form on your website, it should be a chance to connect with a real customer. But if your business only works in certain regions, opening your forms to the whole world often means sorting through spam and messages from people you can’t actually serve.
Country-based form filtering solves this problem. You can block junk submissions that waste your time and focus only on prospects who are actually in your service area or target market.
I’ve used this approach to cut down on spam while making my forms more effective for lead generation.
And in this article, I’ll show you how to set up geographic restrictions for your WordPress form entries. This will help you get a more focused and secure lead generation system up and running in just a few minutes.
Why Block Form Entries From Certain Countries? 🌍
Blocking form entries by country is one of the simplest ways to reduce spam, save time, and collect only relevant leads. If your business only serves certain regions, then letting anyone worldwide submit your forms usually means dealing with junk entries and messages that will never turn into real customers.
When I set up contact forms on my own WordPress websites, I quickly noticed the same issue: my inbox filled up fast, but most of the messages weren’t helpful.
Instead of real inquiries, I was dealing with spam submissions, unrelated messages, and entries from regions I didn’t even serve.
For a local business, this can be overwhelming and makes it harder to spot genuine opportunities.
Blocking form entries from certain countries helps you:
Reduce spam and irrelevant messages so your inbox stays clean.
Save time by focusing only on potential customers in your target area.
Improve lead quality because you’re reaching people who are actually interested in your services.
Protect your business from fraud by cutting off high-risk locations.
When I applied this approach to my contact forms, they became more useful. Instead of spending time deleting junk submissions, I could focus on replying to people who are genuinely interested.
Now, let’s take a look at how to easily block form entries from specific countries in WordPress.
You can use the links below to jump to the method of your choice:
Method 1: Block Form Submissions From Specific Countries (Recommended)
If you want to block form submissions from specific countries without touching any code, the easiest way is to use the built-in Country Filter feature in WPForms.
This lets you either ‘allow’ certain countries to submit your form or ‘deny’ specific countries that often send spam or irrelevant leads. This prevents spam from ever reaching your inbox.
Plus, the filter works right inside the form builder, so you can set it up in just a few clicks.

At WPBeginner, we use WPForms for creating all kinds of forms, from simple contact forms to complex surveys and registration forms. We’ve thoroughly tested it over the years, which you can read more about in our full WPForms review.
Step 1: Install and Activate WPForms
First, you’ll need to install and activate the WPForms plugin. We have a complete guide on how to install a WordPress plugin that walks you through the process.
📌Note: WPForms offers a free plan. But advanced spam-fighting tools like the Country Filter, smart conditional logic, and multiple spam protection methods are only part of WPForms Pro.
Upon activation, you can edit the form where you want to block entries.
Step 2: Choose or Create a WordPress Form
Just go to the WPForms » All Forms page and click ‘Edit’ under your form’s name.


If you don’t have a form yet, then you can easily create one using WPForms’ drag-and-drop builder. Just head to WPForms » Add New from your WordPress dashboard.
The plugin offers dozens of premade form templates for contact forms, surveys, order forms, and more, so you can get started quickly.
You can also use the AI form builder to generate a custom template based on your needs. Just give your form a name and describe what you want, and it will create a starting point for you.
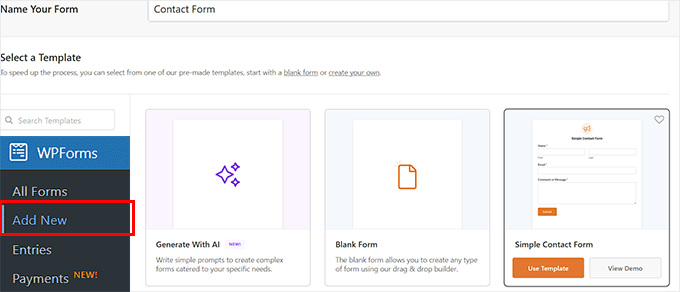

Once your template is ready, it will open in WPForms’ visual editor, where you can edit, delete, or rearrange form fields with just a few clicks.
I really like how smooth the process is—it took me only a couple of minutes to go from a blank page to a ready-to-use form when I tested it.
Here are some step-by-step guides you can follow to create different types of forms:
Step 3: Enable Country Filter
Once you’ve done that, you need to go to Settings » Spam Protection & Security, and scroll down to Filtering in the WPForms form editor.
From here, you can decide whether to allow or block form submissions from specific countries. To do this, toggle on the ‘Enable Country Filter’ option.
This will reveal a dropdown where you can choose either ‘Allow’ or ‘Deny’.
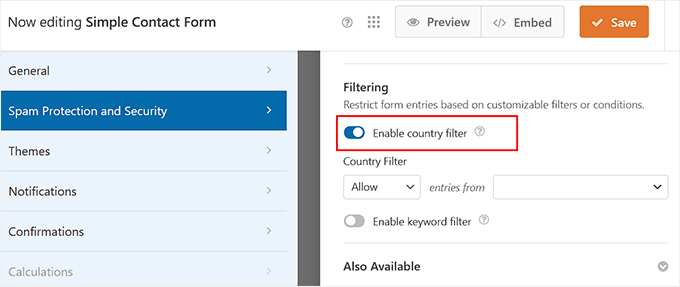

For example, if your business only serves customers in the United States, then you can set the filter to ‘Allow’ and select ‘United States’ from the dropdown list next to it.
This is the most direct way to ensure you only get leads from your service area.
Alternatively, you can choose ‘Deny’ to block specific countries. This is useful for reducing spam from regions you don’t serve or that are known for high levels of automated spam traffic.


After setting your preferences, simply click the ‘Save’ button at the top. If you already have the form on your website, then it will be updated automatically, and you don’t need to do anything else.
Step 4: Embed Your Form
If you just created a new form, you’ll need to make it available for users — but don’t worry, this is easy.
WPForms has a built-in block that makes embedding forms super easy. You can simply add it to any page or post without touching a single line of code.


For step-by-step instructions, see our detailed guide on how to embed a form in WordPress.
Method 2: Filter Form Entries by Email Address Using Allowlist or Denylist (Free)
With WPForms, you can also control who can submit your form based on their email address. This is done with an allowlist (only certain addresses or domains can submit) or a denylist (block specific addresses or domains from submitting).
Note: This method doesn’t block users based on their physical location. Instead, it filters submissions using the email domain, which is the part of the email that comes after the “@” symbol.
For instance, in jane@example.com, example.com is the domain.
Some email domains end with a country-specific code, like:
.au → Australia
.cn → China
.uk → United Kingdom
.us → United States
Using this method, you could block entries from country-specific domains like .cn and .uk to reduce irrelevant submissions.
However, keep in mind that this won’t stop users from those countries if they use generic email addresses such as gmail.com or outlook.com.
💡 Expert Tip: I recommend using this method alongside Method 1 for stronger protection. This creates a powerful, two-layer defense.
Method 1 blocks users based on their physical location (IP address), while this method can catch spam from specific email domains that might get through.
Step 1: Install and Activate WPForms
To get started, you’ll need to install and activate the free WPForms plugin. If you’re new to this, we have a complete guide on how to install a WordPress plugin.
📌Note: The Allowlist/Denylist feature is available in the free plan of WPForms.
However, installing WPForms Pro will give you access to advanced features like smart conditional logic, multi-page forms, payment integrations, and more.
Step 2: Choose or Create a WordPress Form
Upon plugin activation, go to the WPForms » All Forms page and click ‘Edit’ on your existing form to add the country restrictions.
If you don’t already have a form, you’ll need to create one first.


WPForms makes this super easy with its library of premade templates and AI form builder. You can have a professional-looking contact form ready in minutes without starting from scratch.
You can follow our guide on how to create a contact form in WordPress to get set up quickly.
Step 3: Set up Allowlist / Denylist
Once your form is open in the WPForms visual editor, make sure you add the ‘Email’ form field from the left column into the form preview on the right.
Keep in mind that this method won’t work if your form doesn’t have an Email field.
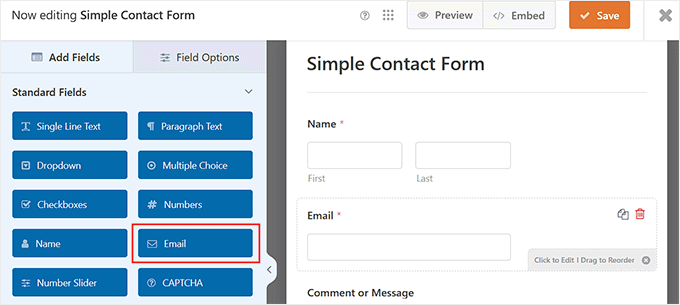

After doing that, click on the field to open its settings in the left column. Then, switch to the ‘Advanced’ tab and scroll down to the ‘Allowlist/Denylist’ section.
By default, the ‘None’ option is selected, meaning there are no restrictions on which email addresses can submit the form.
You can change this by selecting one of the following options:
Denylist: The email addresses or domains you specify will be blocked from submitting the form.
Allowlist: Only the email addresses or domains you specify will be allowed to submit the form.
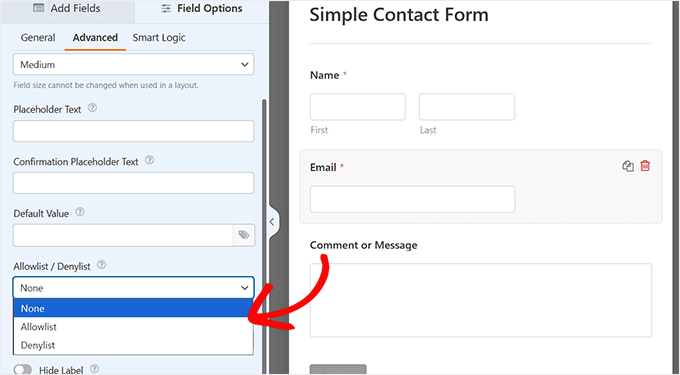

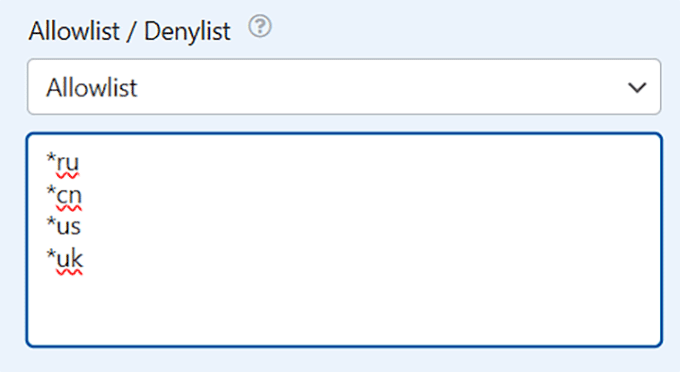
Once you make your choice, a text box will appear where you can enter the email addresses or domains you want to allow or block. Keep in mind that you will need to add each entry on a new line.
To filter form submissions by country, you must use an asterisk (*) before the country code.
For example:
*.au — matches all email addresses ending in .au.
*.us — matches all email addresses ending in .us.
*.uk — matches all email addresses ending in .uk.
*.cn — matches all email addresses ending in .cn.
This method is highly flexible, allowing you to combine country-based rules with individual email addresses for precise control over who can submit your form.

When you’re done, click the ‘Save’ button at the top to store your changes.
Once you do that, your form will be updated automatically if you have already published it on your website.
Step 4: Embed Your WordPress Form
If you created a new form during this tutorial, then you’ll need to add it to your page using the WPForms block in the WordPress editor.


To find out how to do that, you can see our beginner’s guide on embedding forms in WordPress.
Things to Keep in Mind When Blocking Form Entries by Country
Blocking form submissions from certain countries is a powerful way to reduce spam and focus on the leads that matter most.
However, it’s not a foolproof solution, and there are some important points to remember when using country-based restrictions:
🌐 VPNs or proxy servers can bypass the IP-based country restrictions used in Method 1. However, they do not affect email domain filtering (Method 2).
❗Blocking entire countries might unintentionally exclude legitimate users who are potential customers.
🛡️ Country blocking works by matching a user’s IP address to their location using large databases. While WPForms keeps these databases updated, no system is 100% perfect.
✅ Always double-check that your local audience isn’t accidentally included in the blocked countries.
Remembering these tips will help you use country restrictions more effectively without frustrating genuine visitors.
Tip: Layer Additional Spam Protection for Stronger Security
Blocking certain countries is a great first step, but it won’t catch every unwanted submission. Adding extra spam-prevention tools makes your forms more reliable and keeps your inbox cleaner.
Here are some additional strategies to improve your form’s security:
Use CAPTCHA or reCAPTCHA to prevent automated spam submissions.
Enable keyword filtering to block common spam phrases.
Use password-protected forms for sensitive content or internal submissions.
Limit form submissions by IP address to prevent repeated spam attempts.
Use conditional logic to show or hide fields only when necessary, reducing form misuse.
Consider HIPAA-compliant forms if you’re collecting medical or private health information.
For more tips, you can see our guide to preventing contact form spam.
Frequently Asked Questions About Preventing WordPress Form Spam
Even with country restrictions and email filtering in place, it’s normal to have a few questions about protecting your WordPress forms.
I’ve put together the most common concerns I’ve seen from WordPress users, so you can confidently manage your forms without running into issues.
1. Can I block a country without using a plugin?
Yes. You can block a country at the server level by editing your .htaccess file on Apache or by using the NGINX GeoIP/GeoIP2 module to deny IP ranges assigned to that country.
However, this approach is advanced and risky. A single typo can take your site offline, and country IP ranges change over time, so rules need ongoing updates. For most beginners, using WPForms’ built-in Country Filter is the safer, easier option.
2. Will blocking countries in my forms affect my website’s SEO?
No. Blocking form submissions with a plugin like WPForms does not affect your website’s SEO because it only prevents users from submitting the form. Search engine bots can still view and crawl your content normally.
3. Can users bypass country blocking with a VPN or proxy?
Yes. Users with a VPN or proxy can bypass IP-based blocking (Method 1) by making it appear as if they are in an allowed country. However, VPNs do not affect email domain filtering (Method 2), so combining both methods gives stronger protection.
4. Do I need WPForms Pro to block countries?
Yes. The Country Filter feature is available only in WPForms Pro, so you’ll need the premium version to use it.
5. Can I use these methods together?
Yes. You can and should use both methods together for the strongest protection. For example, you could use the Country Filter (Method 1) to deny submissions from countries where you don’t do business, and then add the email Denylist (Method 2) to block common spam domains.
I hope this article helped you learn how to block WordPress form entries from certain countries. You may also want to see our beginner’s guide on how to auto export WordPress form entries and our detailed comparison of Contact Form 7 vs. WPForms to find the best option for your website.
If you liked this article, then please subscribe to our YouTube Channel for WordPress video tutorials. You can also find us on Twitter and Facebook.

